• Jewelry-Making Supplies
  • Kits & Collections
  • Subscriptions
  • Learn to Make
  • Discounts & Deals

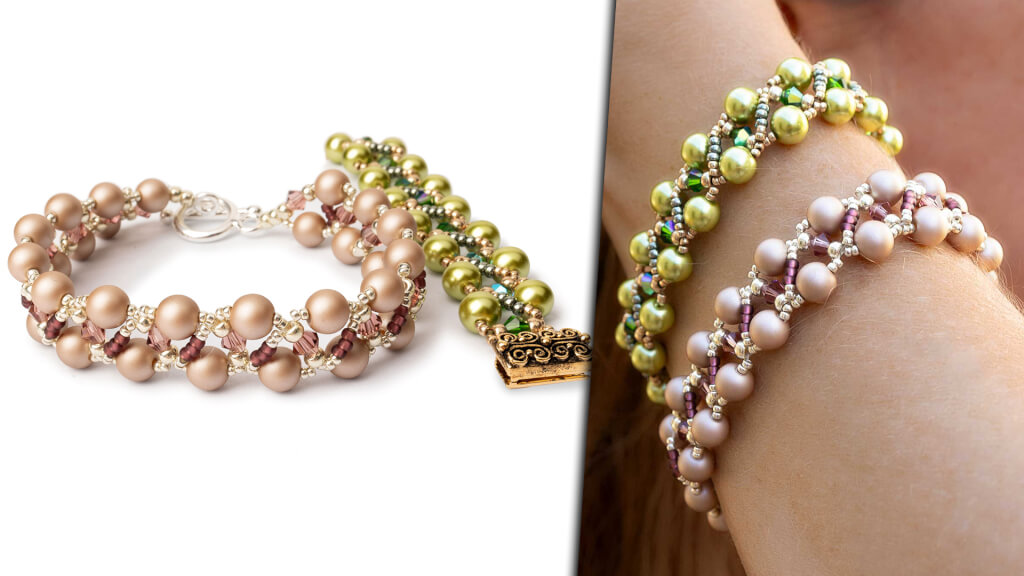
Crossing Colors Bracelet Tutorial

  • Picture of Accessories, Bracelet, Jewelry, Necklace, Ornament
  • Picture of Accessories, Bracelet, Jewelry, Necklace
  • Picture of Accessories, Bracelet, Jewelry, Necklace
  • Picture of Accessories, Bracelet, Jewelry
  • Picture of Accessories, Bracelet, Jewelry
Create a stunning Crossing Colors Bracelet using the Right Angle Weave (RAW) technique in this step-by-step DIY jewelry tutorial by PotomacBeads. In this video, you'll learn how to combine 6mm pearls, 4mm bicones, and various sizes of seed beads (15/0, 11/0, 8/0) to craft a unique bracelet with a beautiful angled pattern. Whether you're a beginner or an experienced beader, this project is perfect for honing your skills and creating wearable art. Check the links below for the full list of materials and color variations!

Step 1: Choose Your Materials

Step 2: Watch the 
Video Tutorial

Crossing Colors Bracelet Tutorial
The designer's suggested colors & materials:
  • Potomac Pearls - Pastel Green 6mm, 34 Beads
  • Potomac Crystal Bicone Beads - Dark Moss Green AB 4mm, 17 Beads
  • Miyuki Seed Beads - Duracoat Galvanized Dark Steel Green 11/0, ~ 1 Gram
  • Miyuki Seed Beads - Duracoat Galvanized Champagne 8/0, ~ 1 Gram
  • Miyuki Seed Beads - Duracoat Galvanized Champagne 15/0, ~ 1 Gram
  • Claspgarten Filigree Coiled Rectangle Box Push Clasp | 13x6mm | 2-Strand | 23k Gold Plated, 1 Piece
  • Step 3: Need More Help? Follow these Steps

    steps

    Quick Project Steps

    Step 1: Prepare your materials, including pearls, bicones, and seed beads. Cut about 5 feet of Dragon Thread and add a stop bead. Step 2: Start the Right Angle Weave (RAW) by creating the first unit with four sides using pearls, bicones, and seed beads. Step 3: Continue building more units, connecting them by sewing through adjacent beads. Step 4: Attach the two-strand Garden Clasp using seed beads to form a secure loop on each side. Reinforce the thread multiple times for durability. Step 5: Add the diagonal embellishment by stitching through the top layer with seed beads in a repeating pattern to create the zigzag effect. Step 6: Finish by tying off and burning the thread ends. Ensure all beads and the clasp are tightly secured.

    Step 5: Need Any Extra Materials?

    • Potomacbeads Beading Ruler | Ultimate | Crystal | 9x3"
    • Thread Zap II
    • BeadTec Beading Needles Sizes 10, 11, 12 | Mix Pack of 6
    • Plastic Caliper Tool - White
    • BeadTec DragonThread - Crystal/White | Size 6 (Medium) | 50 Meter Spool
    • BeadTec DragonThread - Green | Size 6 (Medium) | 50 Meter Spool

    Step 5: Need Any Extra Materials?

    BeadTec Beading Ruler | Advanced | 6x3"
    Crossing Colors Bracelet Tutorial
    PotomacBeads Pliers - Round Nose Pliers

    Step 6: Choose Your Next Project

    • Learn how to create beautiful and artistic RounDuo Bangle Stacker Bracelets in this DIY jewelry-making tutorial. Using RounDuo or RounDuo Mini beads paired with 11/0, 15/0, and 8/0 seed beads, this video will guide you through each step, from selecting materials to finishing with a clasp or continuous bangle design.

      Read More

    Step 6: Choose Your Next Project

    • Glasgow Rose Embroidered Pendant - DIY Jewelry Making Tutorial by PotomacBeads
    • Glasgow Rose Embroidered Pendant - DIY Jewelry Making Tutorial by PotomacBeads

    Watch Anna Tonnesen as she provides detailed step by step tutorial instructions to learn to embroider with beads. Create the Glasgow Rose pendant or create your own masterpiece of DIY jewelry following this project tutorial. Learn how to lay out your embroidery project, cut and shape your surface, sew on beads, apply the backing and seem the sides of the piece.
    • Comet Earrings - DIY Jewelry Making Tutorial by PotomacBeads
    • Flower Gem Earrings - DIY Jewelry Making Tutorial by PotomacBeads
    • Embroidered Rings - DIY Jewelry Making Tutorial by PotomacBeads

    Join Our Growing Community

    Community profile photo 1
    Community profile photo 2
    Community profile photo 3
    Community profile photo 4

    Our Testimonials

    • 5
      6204 (83.7%)
    • 4
      837 (11.3%)
    • 3
      312 (4.2%)
    • 2
      35 (0.5%)
    • 1
      27 (0.4%)
    95% of customers rate this company 4- or 5-stars
    Newest to Oldest
    • Favorite Reviews
    • Highest to Lowest
    • Newest to Oldest
    All Ratings
    • All Ratings
    • 5 ★ Reviews
    • 4 ★ Reviews
    • 3 ★ Reviews
    • 2 ★ Reviews
    • 1 ★ Reviews
    Bernadine J. Verified Customer
    06-03-25

    Easy use of site

    Karen A. Verified Customer
    06-03-25

    Thus far, I'm happy with Potomac Bead Co. I have placed orders in the past and have been pleased.

    Dianne F. Verified Customer
    06-02-25

    I watched several "how to" videos, which answered questions I had and decided to shop.  I purchased items from the videos and look forward to using them.

    Debbie O. Verified Customer
    06-02-25

    The pull-down menu under the "learn about" tab for "bead patterns" did not work, so I could not shop for patterns this time.

    Rosemary K. Verified Customer
    06-02-25

    The quality of the beads and the care of service has always been #1 with Potomac. I love Potomac Beads.

    Syndi T. Verified Customer
    06-02-25

    Always so easy to find pattern that are fun and easy to make with beautiful results. I love having bought 5 patterns package a month. I just wish I had more time to sit and bead.

    Melody F. Verified Customer
    06-02-25

    Easy to find items, but many things are out of stock

    Anne D. Verified Customer
    06-02-25

    Fun

    Nita G. Verified Customer
    06-02-25

    Ordering was easy, delivery was quick, and the kit has everything needed for the project.

    Linda D. Verified Customer
    06-02-25

    I wanted order shipped to another address and I don’t think that got through. Hopefully I will have my order by 6/11.

    Only Visible on Admin Mode

    Item Description

    Create a stunning Crossing Colors Bracelet using the Right Angle Weave (RAW) technique in this step-by-step DIY jewelry tutorial by PotomacBeads. In this video, you'll learn how to combine 6mm pearls, 4mm bicones, and various sizes of seed beads (15/0, 11/0, 8/0) to craft a unique bracelet with a beautiful angled pattern. Whether you're a beginner or an experienced beader, this project is perfect for honing your skills and creating wearable art. Check the links below for the full list of materials and color variations!

    Designer's Material List

    The designer's suggested colors & materials:
  • Potomac Pearls - Pastel Green 6mm, 34 Beads
  • Potomac Crystal Bicone Beads - Dark Moss Green AB 4mm, 17 Beads
  • Miyuki Seed Beads - Duracoat Galvanized Dark Steel Green 11/0, ~ 1 Gram
  • Miyuki Seed Beads - Duracoat Galvanized Champagne 8/0, ~ 1 Gram
  • Miyuki Seed Beads - Duracoat Galvanized Champagne 15/0, ~ 1 Gram
  • Claspgarten Filigree Coiled Rectangle Box Push Clasp | 13x6mm | 2-Strand | 23k Gold Plated, 1 Piece
  • Project Steps

    Step 1: Prepare your materials, including pearls, bicones, and seed beads. Cut about 5 feet of Dragon Thread and add a stop bead. Step 2: Start the Right Angle Weave (RAW) by creating the first unit with four sides using pearls, bicones, and seed beads. Step 3: Continue building more units, connecting them by sewing through adjacent beads. Step 4: Attach the two-strand Garden Clasp using seed beads to form a secure loop on each side. Reinforce the thread multiple times for durability. Step 5: Add the diagonal embellishment by stitching through the top layer with seed beads in a repeating pattern to create the zigzag effect. Step 6: Finish by tying off and burning the thread ends. Ensure all beads and the clasp are tightly secured.