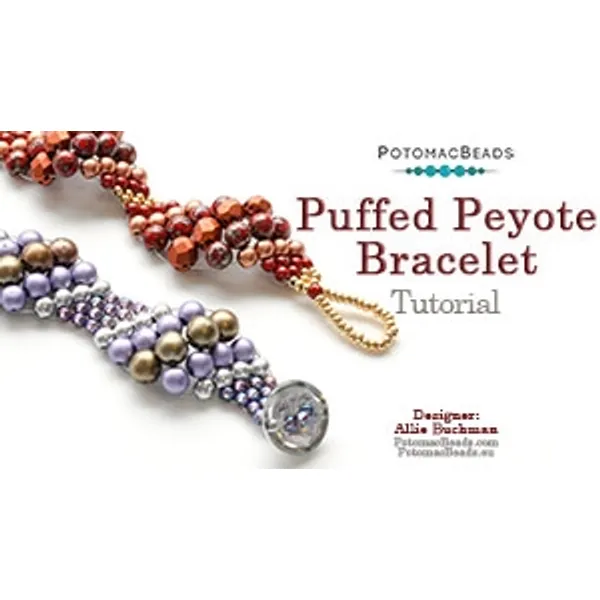
In this video tutorial from PotomacBeads, Allie teaches you how to make a "Puffed" peyote stitch bracelet design using 3 different sizes of multi-hole round beads. The RounDuo, RounDuo Mini, & RounTrio beads are all produced by PotomacBeads, and create a quick and easy customizable creation! Find a list of supplies used in this project in the description below.
The Designer’s suggested colors and materials for ~7.5-inch (19cm) wrist: RounDuo® Beads - Opaque Red Picasso Faceted RounTrio® Beads - Copper RounDuo® Mini Beads - Vintage Copper Miyuki Seed Beads 11/0 - Duracoat Galvanized Gold Miyuki Seed Beads 8/0 - Duracoat Opaque Maroon Cup Buttons - Magic Wine
Step 3: Need More Help? Follow these Steps
Quick Project Steps
Start with a stop bead, leaving a tail for clasp attachment. Add four 8/0 seed beads, initiating the peyote stitch pattern. Incorporate RounDuo, RounDuo Mini, and RounTrio beads, alternating with 11/0 and 8/0 seed beads to create the puffed effect. Continue building the bracelet body by following the peyote stitch, ensuring to maintain the pattern and proper bead alignment. Complete the bracelet length as desired, finishing with rows of seed beads to prepare for clasp addition. Attach the cup button clasp using 11/0 seed beads, ensuring a secure closure. Finalize the bracelet by adding a loop for the clasp, and weave in any remaining threads securely.
Learn how to create beautiful and artistic RounDuo Bangle Stacker Bracelets in this DIY jewelry-making tutorial. Using RounDuo or RounDuo Mini beads paired with 11/0, 15/0, and 8/0 seed beads, this video will guide you through each step, from selecting materials to finishing with a clasp or continuous bangle design.
Learn how to create beautiful and artistic RounDuo Bangle Stacker Bracelets in this DIY jewelry-making tutorial. Using RounDuo or RounDuo Mini beads paired with 11/0, 15/0, and 8/0 seed beads, this video will guide you through each step, from selecting materials to finishing with a clasp or continuous bangle design. Perfect for both beginners and advanced beaders, this project allows for endless creativity with color combinations. Shop the materials needed and follow along to create your own unique bracelet!
Glasgow Rose Embroidered Pendant - DIY Jewelry Making Tutorial by PotomacBeads
Glasgow Rose Embroidered Pendant - DIY Jewelry Making Tutorial by PotomacBeads
Watch Anna Tonnesen as she provides detailed step by step tutorial instructions to learn to embroider with beads. Create the Glasgow Rose pendant or create your own masterpiece of DIY jewelry following this project tutorial. Learn how to lay out your embroidery project, cut and shape your surface, sew on beads, apply the backing and seem the sides of the piece.
Comet Earrings - DIY Jewelry Making Tutorial by PotomacBeads
Flower Gem Earrings - DIY Jewelry Making Tutorial by PotomacBeads
Embroidered Rings - DIY Jewelry Making Tutorial by PotomacBeads
I love your designs and tutorials…..I also like to have a printed tutorial to accompany the videos. Thank you.
Share
Sue B.
05-29-25
I have a hard time finding specific beads although the more I shop the more I find how to look for specific items. I'm a little disappointed I bought some beads for a tutorial you have online and now I can't find the tutorial,
Share
CARLA J.
05-29-25
I had a slight issue with my information and it was resolved promptly.
Share
IRMA D.
05-28-25
So far, good!
Share
Cheryl W.
05-28-25
Interesting
Share
Jenny B.
05-28-25
Always easy and friendly.
Share
Alverta C.
05-28-25
I have never been able to place an order this fast! Love it.
Share
MHR
05-28-25
your pop ups are annoying and I would prefer to click add to cart without having to visit each product page
Share
Kimberly M.
05-28-25
It was great. I have found that as long as the item i want is in stock I get it shipped fast.
Share
Linda S.
05-28-25
Not sure why I need to be texted a code to get a free pattern.
Share
Loading...
Only Visible on Admin Mode
Item Description
In this video tutorial from PotomacBeads, Allie teaches you how to make a "Puffed" peyote stitch bracelet design using 3 different sizes of multi-hole round beads. The RounDuo, RounDuo Mini, & RounTrio beads are all produced by PotomacBeads, and create a quick and easy customizable creation! Find a list of supplies used in this project in the description below.
Designer's Material List
The Designer’s suggested colors and materials for ~7.5-inch (19cm) wrist: RounDuo® Beads - Opaque Red Picasso Faceted RounTrio® Beads - Copper RounDuo® Mini Beads - Vintage Copper Miyuki Seed Beads 11/0 - Duracoat Galvanized Gold Miyuki Seed Beads 8/0 - Duracoat Opaque Maroon Cup Buttons - Magic Wine
Project Steps
Start with a stop bead, leaving a tail for clasp attachment. Add four 8/0 seed beads, initiating the peyote stitch pattern. Incorporate RounDuo, RounDuo Mini, and RounTrio beads, alternating with 11/0 and 8/0 seed beads to create the puffed effect. Continue building the bracelet body by following the peyote stitch, ensuring to maintain the pattern and proper bead alignment. Complete the bracelet length as desired, finishing with rows of seed beads to prepare for clasp addition. Attach the cup button clasp using 11/0 seed beads, ensuring a secure closure. Finalize the bracelet by adding a loop for the clasp, and weave in any remaining threads securely.
Bullet 1
Bullet 2
Bullet 3
You must be logged in to access the wishlist feature.